Header Bidding
Header bidding is an advanced programmatic technique which allows publishers to offer their inventory to multiple SSPs and ad exchanges before requesting ad servers (DFP).

Google Ad Manager (formerly DFP) has been the most popular ad server for a long time. DFP has enabled publishers to add external demand partners to their ad stack. Google did, however, have a trick up its sleeve – allowing it to buy impressions before any external demand partners, using Dynamic Allocation in AdX.
This prompted independent ad tech vendors to develop a technique that levelled the playing field for them. This technique is now popularly known as header bidding.
Despite its widespread adoption and popularity, the technical aspects of header bidding still remain a mystery to many publishers. In order for publishers to understand header bidding, how it works, and its advantages and disadvantages, we’ve created this comprehensive guide.
Header bidding is a type of programmatic auction in which bid requests are simultaneously sent to multiple demand partners in real-time—which means that every single ad impression has the chance to be purchased at its maximum value, based on available demand.
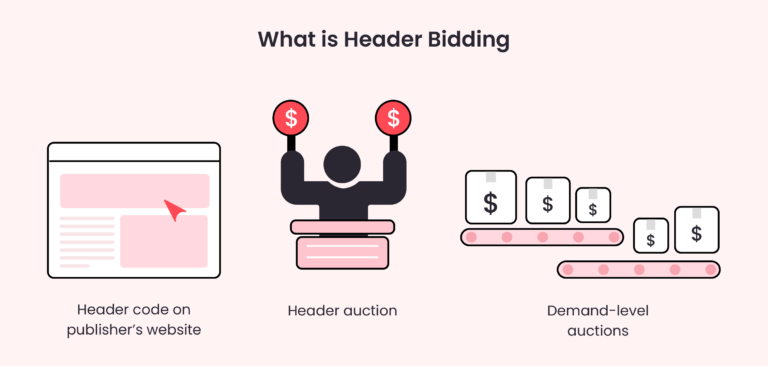
These bids are then passed through various filters (floor price and targeting criteria) configured by publishers in their ad server. The highest bid is selected from the filtered bids, and finally, the ad creative is displayed on the user’s screen. This entire process takes a fraction of a second.
Header bidding requires a JavaScript code snippet to be added to the <head> section of the website. This JS code enables publishers to generate bid requests by using browser resources.
History of Header Bidding
Header bidding made it to ad tech somewhere around 2014. And only after one year, in 2015, the technique went viral. In the beginning, header bidding was variously called tagless, pre-bidding, full bidding, parallel auction, and many other names, as reported in this Digiday feature. In June 2018, AdExchanger published this article on header bidding, and the term was cemented. And the rest, as they say, is history.
Comparison With Waterfall Method
Before header bidding, the programmatic ecosystem was using a waterfall setup to sell inventory. Waterfall setup (or daisy-chaining) involves a ladder of networks and/or exchanges, arranged from top to bottom in order of performance to the publisher. Based on the networks’ past record in terms of yield (eCPM), fill rate, latency, and more. The impression(s) is passed from network to network, from the top-down, until it is (are) sold.

It’s a matter of prioritization. As you move down the waterfall, the CPM price floors decrease, but there’s also less access to the best inventory for advertisers to bid on. Even though this process theoretically ensured that no inventory was left unsold and fetched a publisher the best price it could, in reality the opposite happened.
The publisher waterfall was an inefficient way of selling inventory:
- • Time-taking process: The inventory took a lot of time to sell, passing from bidder to bidder.
- • Less bang for the buck: Publishers were not getting the true value of their impressions. For instance, there were chances that the bidders next in line may have been willing to pay more, but the premium inventory already got sold to previous bidders at a lower cost. And there was no way to compare performance and optimize it.
- • Unfair competition: Advertisers were not getting a fair chance to reach the right audiences, ultimately hampering the publishers’ revenue opportunity.
- • Hard to set targeting: Targeting improves revenue, however, waterfall setup was not equipped to match advertisers with audiences.
Header bidding entered as a solution:
Header auction in real-time gives publishers the chance to maximize the revenue generated from every single impression.
Since header bidding sends bid requests simultaneously to all the demand partners, it gives them equal opportunity to make their bids.
Based on the bids submitted, publishers can compare the performance of each transaction using log-level data and work on tweaks for greater yield.
It is designed to compete with Google auctions. Hence, impressions go to header bidding partners and Google’s ad server simultaneously.
Seeing its benefits over publisher waterfall, the industry started investing in the tech. Fast forward to 2020, most publishers monetize their ad inventory (supporting numbers can be found in the next subheading) via header bidding along with other methods—programmatic and direct deals.
Effects on Publisher Revenue
Header bidding has helped publishers grow their revenues by 20-50%. The Telegraph, a news website, has seen a 70+% CPM uplift just after 9 months of implementing header auction.
Through AdPushup’s header bidding solution, CCNA7, a niche education website, implemented header bidding with ad refresh to experience a 500% revenue uplift in the span of six months.
According to an eMarketer report, the current global spending on header bidding is around $70 billion. And by 2021, this number is supposed to grow by 87% and reach $81 billion.
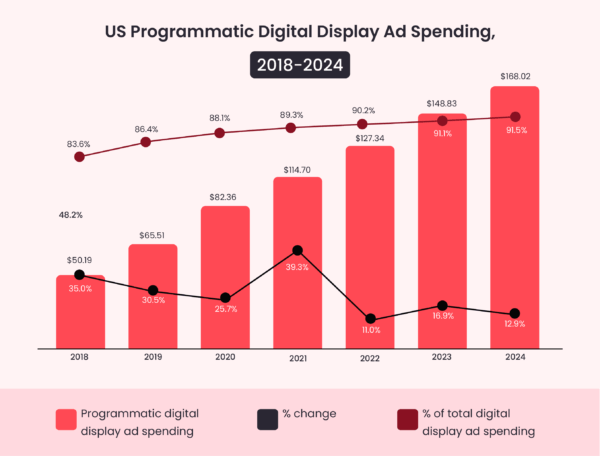
80% of the top 1K US publishers (based on Alexa rankings) use header bidding with an average of 7 demand partners per page.
But, this is one side of data. According to the same eMarketer’s research, the growth rate for the adoption of header bidding seems to be decreasing. Right now, the header bidding adoption rate is 20% and by 2021, it will become 15%. This is happening because of two things:
Header bidding is reaching its growth threshold as most target publishers have already adopted the technique.
Publishers are invested in other competing technologies (like Google’s Open Bidding) for monetizing their inventory.
Whatever the reason, on an individual level, publishers can still make the most of header bidding, as the demand side continues to increase ad spend.
Header Bidding Wrapper and Adapter
The browser generates an individual bid request to all demand partners every time an impression is available. For this, publishers need to insert each demand partner’s code snippet on their website. Inserting or deleting these snippets of code each time a demand partner is added or dropped can get tedious really fast. Also, making constant changes to the header code of a website without dedicated developer support can lead to site outages or the layout being disrupted.
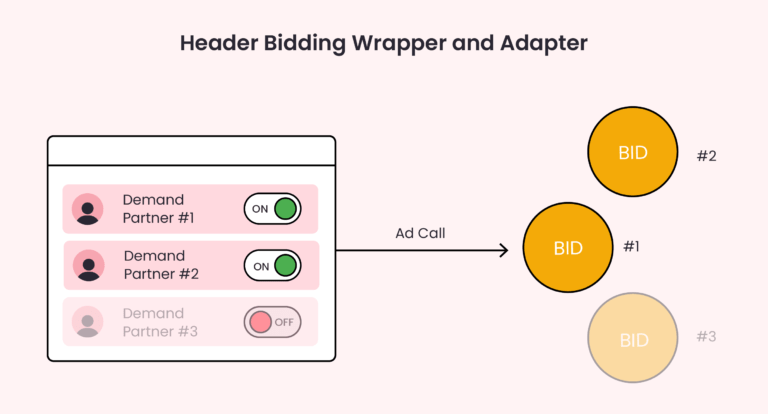
To eliminate these issues (at least to an extent), header bidding wrappers were developed.
A header bidding wrapper works like a container that holds the code snippets from all the demand partners in one place. Some wrappers even offer a GUI (like AdPushup), so publishers don’t have to mess around with code at all, instead toggle demand partners on and off from a control panel. Along with that, the wrapper can also be used to set a floor price and the timeouts.
Some well-known header bidding wrappers are Prebid.js, Pubfood.js and BiddR°360.
How does Header Bidding Work: Client-side vs. Server-side
Header bidding starts as soon as a webpage begins to load on the user’s browser. In parallel, the wrapper initiates the auction by sending bid requests to the demand partners.
Header auction works on the first-price auction model, which means that the highest bidder gets to serve their ad creative, and they pay exactly what they bid during the auction.
Before header auction bids are submitted to the wrapper, the demand partners run their own auctions to decide which advertiser or DSP will participate in the main header auction.
In case no demand partners’ bid meets the floor price or the timeouts have exhausted, the inventory is offered to fallback networks like AdSense, based on Ad Manager settings.
Header bidding can be broadly classified into two types: client-side and server-side.
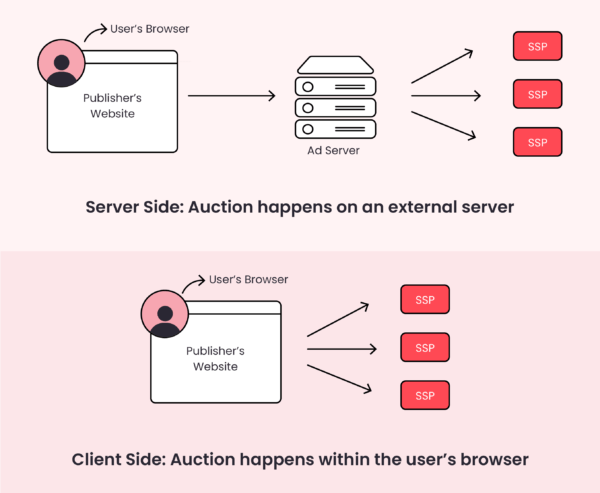
In the case of client-side header bidding, the auction runs on the user’s browser. This allows cookie matching for better targeting as publishers can allow advertisers to access bid-level data. However, client-side header bidding is notorious for causing high page latency, due to higher browser resource and network consumption.
In the case of server-side header bidding, the auction is conducted on a dedicated auction server away from the user’s browser. This technique saves network bandwidth and browser resources, decreasing page latency as a result. However, when it comes to targeting, the server-side method fails to deliver the desired results due to decreased cookie match rates.
In order to get the best of both auction types, publishers can also choose hybrid header bidding. This is where publishers run both client-side and server-side header bidding together, usually within a multivariate testing environment (more of which is explained later).
Why is Header Bidding Better Than Adsense?
Header bidding and Google Adsense are not direct competitors as they serve different purposes for publishers of different scales.
Though both are monetization methods for websites, they operate differently. Google AdSense is meant for new and small-scale publishers. It is easy to use since it allows publishers to serve automatic text, image, video, or interactive media ads that are targeted to site content and audience. It works on the CPC (Cost-Per-Click) model, and Google takes care of all the ad serving processes.
On the other hand, header bidding, as mentioned earlier in our guide, is a programmatic advertising technique, which allows publishers to offer their ad inventory to multiple ad exchanges simultaneously. It’s more advanced and meant for large-scale publishers.
In other words, if you are looking for a large-scale ad-serving solution, it’s more feasible to switch from Google Adsense to header bidding.
Header bidding vs Real-time bidding (RTB)
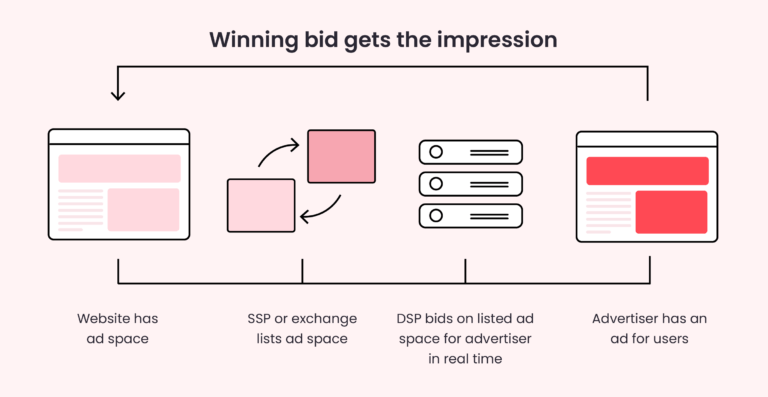
Real-time bidding is simply a mechanism, which makes ad buying and selling possible through real-time auctions. The mechanism is similar to the stock exchange where traders buy/sell stocks in real time.
Both header bidding and real-time bidding are the techniques that are used in programmatic advertising and operate at the different stages of ad tech.
Header bidding occurs before the ad server call, which allows publishers to increase competition and potentially increase ad revenue, while RTB occurs after the ad server call, with advertisers bidding on available ad impressions in real time.
Advantages of Header Bidding
Here are the benefits of header bidding for publishers:
- • Maximized demand: Header auction lets publishers add multiple demand partners. These demand partners are further connected to DSPs and advertisers. This supply chain helps increase bid competition for the inventory and generates more revenue.
- • Transparent exchange: Even with a complex supply chain, header bidding is known to keep things really simple. Publishers can easily check which part of the inventory is sold to which demand partner with bid-level data. Also, many wrappers provide advanced reporting and analytics to help publishers monitor their earnings and performance.
- • Better control: Header bidding allows publishers to configure the auction as per their needs, this includes customizing the floor price, setting timeouts, and adding or removing demand partners to balance ad revenue with page latency.
- • Minimum discrepancy: Since auction is organized on the publisher’s platform via a wrapper, it helps publishers to track the transactions. Also, running simultaneous auctions helps to reduce the discrepancy—fewer moving parts mean less discrepancy.
- • Benefits advertisers too: Header bidding is successful because it benefits both the sell- and buy-side. Just like publishers, advertisers are readily purchasing inventory sold via header bidding. The transparent and low discrepancy environment encourages advertisers to invest equally in header bidding.
- • Compete with Google AdX: Google AdX is known to pass impression to its partner first, then other publisher-added networks. This decreases the competition opportunity. However, with header bidding, both AdX and header bidding partners get to bid together.
- • Increased Revenue: Unlike waterfall ad serving where ad impressions were served to the demand sources in a sequential manner based on predetermined priorities, header bidding prioritizes the highest bidders. With header bidding, the highest bidder in the auction secures the opportunity to display advertisements on publishers’ ad inventory, which results in higher profit for publishers.
- • Increased Ad Quality: Header bidding increases the competition among advertisers for the ad inventory, particularly those aligned with a publisher’s audience and eager to display their ads. Consequently, publishers have greater opportunities to display ads tailored to their audience’s interests, and this results in better ad quality.
- • Faster Loading Times: Keeping loading times in check is undoubtedly one of the crucial factors behind a better user experience. Fortunately, header bidding decreases the loading times. A header bidding wrapper quickly contacts ad exchanges and demand partners to secure bids within milliseconds.
Disadvantages of Header Bidding
Everything about header bidding sounds great so far. But the technique is not without its challenges. To start with, it is complicated to set up and implement. Next, the client-side method contributes to increased page latency.
Here are some other drawbacks publishers should know about:
- • Complicated setup: Implementation process is a bit tricky. From choosing the right wrapper to integrating codes of multiple demand partners, publishers need technical expertise to comprehend and implement header bidding.
- • Increased cost: Header auction often requires a dedicated person (or team) to monitor and improve performance. This includes managing the ad units, adding/removing demand partners, and more. This adds to the cost of running the auction.
- • Increased latency: In case of client-side header bidding, the auctions run on the user’s browser, contributing to high page latency. However, with server-side auctions like Google’s Open Bidding this problem can be resolved at the cost of cookie matching.
- • Lack of server-side transparency: In case of server-side auctions, things are managed by the vendor running the auction server, making it hard for publishers to access reporting about bid-level and demand partner performance. Lack of transparency makes publishers accept the bids they are getting, minimizing the scope of improvement.
Header Bidding Wrapper and Adapter
The browser generates an individual bid request to all demand partners every time an impression is available. For this, publishers need to insert each demand partner’s code snippet on their website. Inserting or deleting these snippets of code each time a demand partner is added or dropped can get tedious fast. Also, making constant changes to the header code of a website without dedicated developer support can lead to site outages or the layout being disrupted.
To eliminate these issues (at least to an extent), header bidding wrappers were developed.
A header bidding wrapper works like a container that holds the code snippets from all the demand partners in one place. Some wrappers even offer a GUI (Graphical User Interface) like AdPushup, so publishers don’t have to mess around with code at all. They can Instead toggle demand partners on and off from a control panel. Along with that, the wrapper can also be used to set a floor price and the timeouts.
Some well-known header bidding wrappers are Prebid.js, Pubfood.js and BiddR°360.
Let’s now delve deeper and talk about 2 primary and most commonly utilized header bidding wrappers.
Types of Header Bidding Wrappers
Open Source
As the name suggests, open-source header bidding wrappers are free and open-source solutions that are freely available for anyone to access and customize. These wrappers are generally prebid.js, prebid server, and pubfood. It’s a community-driven development model, which is maintained by developer communities and then integrated into ad servers for everyone to benefit from.
With this solution, publishers are free to make adjustments to the wrapper according to their specific needs. This includes optimizing ad performance, integrating additional features and more. However many publishers end up paying for vendor support for several configurations, integration, and other kinds of support. Thus, publishers looking to opt for open-source solutions must be well-versed in the technicalities of the software to better manage its functionalities.
Proprietary Wrapper
On the other hand, the proprietary wrapper is a closed-source solution offered by a single entity. It’s a wrapper that is owned by ad tech companies. It comes with its own set of features, and functionalities that facilitate the effectiveness and efficiency of header bidding. However due to its proprietary nature, making adjustments or customizations to the solution is not feasible, as it is with an open-source header bidding wrapper.
Although publishers relying on a proprietary wrapper may be dependent on it, one advantage of it lies in its ease of implementation and the accessibility of support when needed. Moreover, these wrappers or adapters come with their own analytical tools for publishers to better manage and optimize their ad operations. But one thing publishers must note is that the customization is limited as the publishers have to rely on the wrapper owner to implement new features or to address certain issues.
Introduction of Prebid: Open Source HB Wrapper
Prebid is an open-source header bidding wrapper created by AppNexus. In order to use Prebid, publishers insert their JavaScript snippets onto their websites. This allows publishers to set up line items and make async ad calls, without having to develop in-house technique.
Publishers can allow third-party demand partners to bid on their inventory using the Prebid adapter. So for instance, if AppNexus is one of the demand partners you want to work with, you need to integrate your Prebid with AppNexus’s adapter.
Being an open-source technique, many leading ad tech vendors contribute to the development of Prebid, with AppNexus and Rubicon Project being the two biggest contributors.
Prebid is designed to be flexible and can be used on desktop, mobile, app, and even AMP inventory. It also supports client-side, server-side, and hybrid header bidding. Being one of the most popular wrappers, most demand partners support Prebid integrations.
Prebid’s Server-Side Solution: Prebid Server
Looking at the industry’s interest in server-side header bidding, Prebid has developed its server-side solution called Prebid Server. This is an extension to prebid.js wrapper – where prebid offers a code to integrate all the publisher’s demand partner bids via both client- and server-side setup.
A publisher already using prebid.js enabling Prebid Server would just require an ad server and demand partners interested in server-side auctions. Basically, publishers can use their existing prebid set up to enable it with Prebid Server.
There is still a learning curve, where publishers’ in-house tech team would have to go through prebid documentation to update their setup.
Pros and Cons of Prebid Server
Pros
- • Prebid server offers enhanced competition among demand partners that potentially leads to higher ad revenues
- • It provides transparency into the bidding process, empowering publishers with valuable insights
- • Since the auctions take place on the server, it offers faster loading times and a smoother ad experience that contributes to a better overall user experience.
- • Prebid server simplifies ad unit management by integrating server-side and client-side platforms and consolidating performance reports for all bidders and demand partners.
Cons
- • Running a Prebid Server can incur costs for server infrastructure and potentially for technical expertise to manage it
- • Since the auction happens on the server, publishers may have less visibility into individual bids and winning bidders compared to client-side header bidding
- • Prebid Server may struggle with passing cookies and user data from browsers to servers and impacting ad targeting as the industry moves from third-party cookies.
- • While it is simpler than custom solutions, Prebid Server still requires the publishers to have some technical knowledge for setup and management.
Prebid.js: Prebid Client Side Solution
The client in Prebid client-side solutions stands for the end users viewing the ads. In this kind of solution, the auctions (real-time bidding for ad impressions) take place in the users’ browser.
Here’s how it works:
An auction tag, prebid.js is embedded into the source code of a website and then executed in the users’ web browser when they open the website. As soon the prebid.js tag is executed, the users’ browser calls for the bidders to participate in the auction.
Now, because Prebid.js works right in the browser, it gathers plenty of cookies packed with useful information about what users are interested in. This helps advertisers target users based on their recent browsing activities and reach the right audience.
Pros and Cons of Prebid.js
Pros
- • Prebid.js allows publishers to access a larger pool of demand partners, which helps increase the competition and revenue
- • Next, like the prebid server, prebid.js also allows the publishers to see the bids from different demand partners, which leads to more transparency
- • Publishers have control over their ad inventory and can set floor prices and prioritize demand partners
- • Prebid.js is open-source, allowing for community contributions, customization, and continuous improvement.
- • Publishers are not tied to a single ad tech provider, reducing dependency and enhancing flexibility.
Cons
- • First off, integrating and managing Prebid.js can be complex, especially for publishers with limited technical expertise.
- • The client-side nature of Prebid.js can lead to increased page latency and slower load times
- • Next, as an open-source project, the support may vary, and publishers may rely on community forums and documentation for troubleshooting.
- • Lastly, with the multiple demand partners participating, there may be concerns about ad quality and relevance, which could affect user engagement.
Header Bidding and AMP
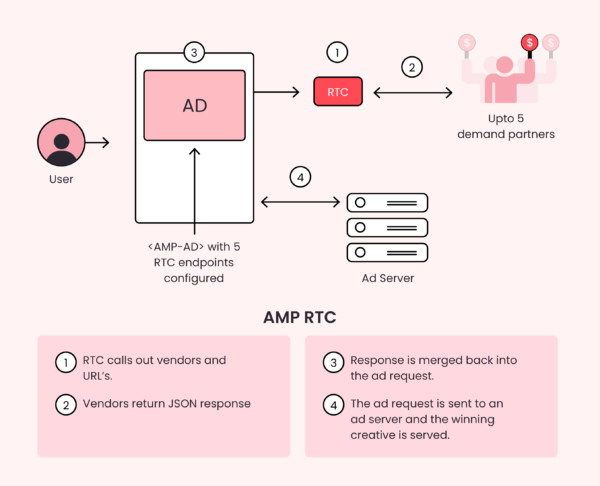
Looking at increased demand for AMP sites, header bidding was updated to work on AMP pages.
Why was header bidding not working on AMP?
Because AMP works by removing unnecessary JS from web pages to load them faster on the user’s mobile browser. In the same process, it removed the HB JS as well.
For publishers looking to monetize their AMP traffic, ad tech has two solutions:
Real-time configuration (RTC)
RTC is a feature of Fast Fetch, released by the AMP team in 2018 as an alternative to traditional header bidding for AMP-enabled pages.
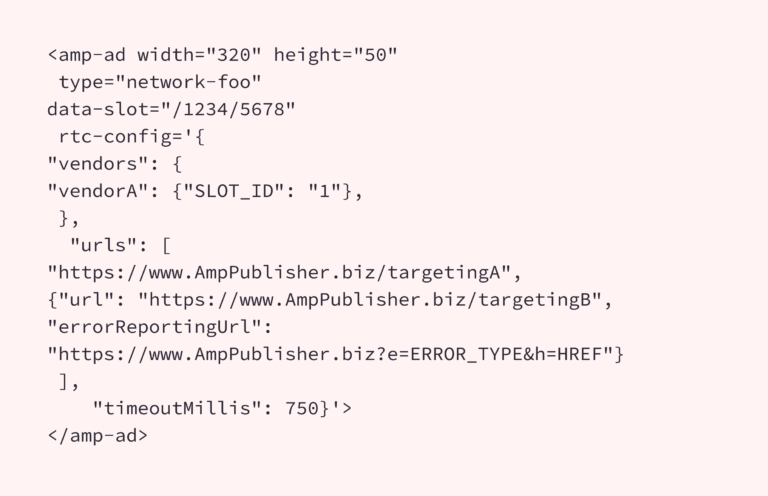
It allows publishers to add up to 5 demand partners with a maximum timeout of 1 second. Setting up RTC is relatively straightforward and publishers can define the vendors they want to work with using a few lines of code:
RTC is a good solution for publishers who want to quickly implement header bidding on AMP pages and don’t have too many requirements or need for customization.
Following are a few vendors that support the RTC protocol.
- 1. AppNexus
- 2. APS
- 3. Criteo
- 4. IndexExchange
- 5. Media.net
Wrapper based integration
The second way is to work with a vendor who provides a header bidding wrapper with AMP support (like AdPushup). Given the nature of AMP, only wrappers with server-to-server integration work well, and client-side implementations will have a higher chance of being blocked by AMP during runtime.
Wrapper-based header bidding gets around the 5 demand partner limitation by routing bids through a single RTC slot. This means that you can add as many demand partners as you want. But that’s not the only advantage of using a wrapper-based solution.
With RTC and its single tag approach, publishers will need a developer to make updates each time they want to add/remove a demand partner. In contrast, a good wrapper will let publishers make these changes from a user-friendly panel. Wrappers will also provide publishers with reporting and analytics data, something for which RTC has no support at this time.
Video Header Bidding and Its Working
Just like standard display ads, video header bidding enables publishers to sell their video ad inventory to the highest bidder. Initially, video header bidding required separate web and server integrations; now, many existing wrappers (like Prebid.js) can be configured to sell video inventory, via both client-side and server-side auctions.
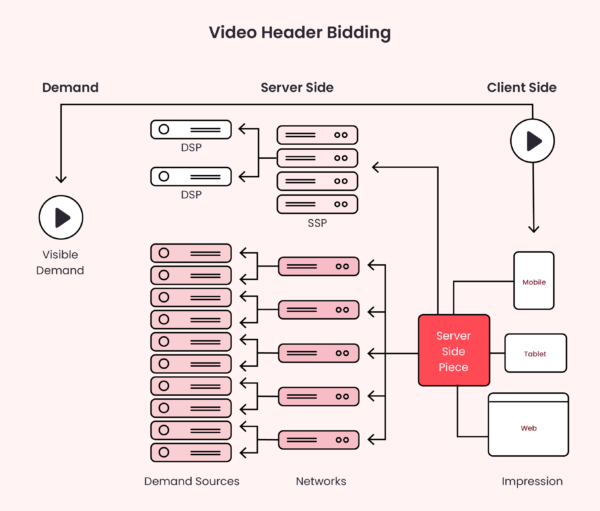
Back in 2016, publishers feared that not many buyers were interested in video inventory, hence they may not get the kind of competition seen with display ads. But, in recent years, video inventory has become valuable. According to Statista, video ad spend amounted to $26 million in 2020 and is expected to see a 6.8% annual growth, reaching $35 million by 2024.
Similarly, as the market for video is growing, many advertisers and demand partners are uniting to encourage publishers to experiment with video inventory. OpenX, AppNexus, and SpotX are some of the demand partners that deal with video ad space.
Google’s Response to Header Bidding: Open Bidding
Shortly after the massive success of header bidding, Google launched its own server-side version and named it Exchange Bidding Dynamic Allocation (later renamed to Open Bidding).
Google pitched Open Bidding by focussing on its server-side benefits. Basically, it offered a server-to-server auction to publishers. With Open Bidding, Google allowed publishers to bring their own demand and also use Google’s demand (AdX) to run S2S auctions on Google’s platform.
Both client-side header auction and Open Bidding have their own pros and cons, so we can’t say one is better than the other. When compared though, the client-side proves to be more transparent and offers better cookie match rates. Whereas Open Bidding saves publishers from complex setup as Google takes care of everything from setup to ongoing auction management.
Publishers can run header bidding and Open Bidding, simultaneously, on Google Ad Manager. This method lets publishers access Google’s demand and add their in-house demand partners to further improve bid pressure.
Here’s how it works:
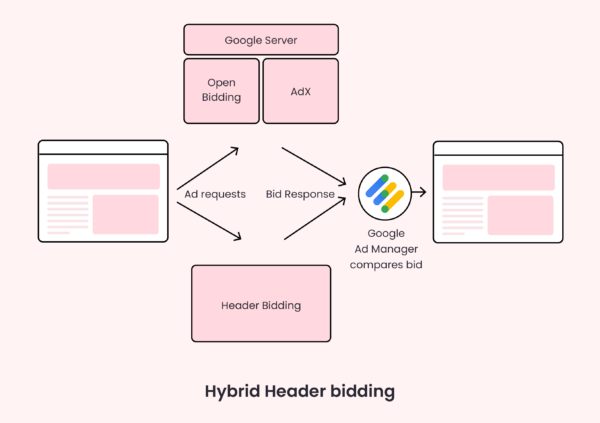
Once an impression is available, ad requests are sent to Google AdX and header bidding. Within the AdX system, both AdX and Open Bidding buyers place their bids to win the impression. Meanwhile, header bidding starts collecting bid responses from its demand partners. Upon completion, AdX and Open Bidding pass on their winner. Similarly, header bidding passes on another. Finally, GAM compares these bids and chooses the winner (highest bid).
Header Bidding Vs. Open Bidding (EBDA): What's the Difference?
Before we get to header bidding vs Open Bidding, let’s first quickly understand what is open bidding.
What is Open Bidding (EBDA)?
Open bidding, also known as exchange bidding or exchange bidding in dynamic allocation (EBDA), is Google’s solution to header bidding. Since it’s a Google product, open bidding is directly integrated into Google Ad Manager and enables publishers to access demand from various ad exchanges without the need for additional wrappers or setups.
What Differs Header Bidding from Open Bidding?
The major difference between the two lies in the implementation and technology platform.
Traditional header bidding involves the use of header bidding wrappers and is not tied to any specific ad tech provider. On the other hand, open bidding is integrated directly into Google Ad Manager and primarily involves bidding from Google’s ad exchange, namely, Google Adx, along with other participating ad exchanges.
So, while open bidding operates on the principles of header bidding, it’s a solution provided by Google. It provides publishers with the ability to access demand from various ad exchanges directly through the Google Ad Manager platform.
Amazon’s Header Bidding Solution: UAM and TAM
Amazon, the third-largest name in digital advertising after Google and Facebook, is also a key player in the header bidding realm. Its Amazon Publisher Services has two server-side header bidding solutions: UAM and TAM.
UAM (Unified Ad Marketplace) is designed for small- to medium-sized publishers. Amazon offers a dashboard to manage the auction where publishers are allowed to bring their own demand and integrate it into their website.
TAM (Transparent Ad Marketplace) is meant for large publishers. Publishers are given access to 20+ demand partners from Amazon Marketplace including AppNexus, OpenX, Rubicon Project, SpotX. Additionally, publishers can bring their own partners and add them to Amazon TAM.
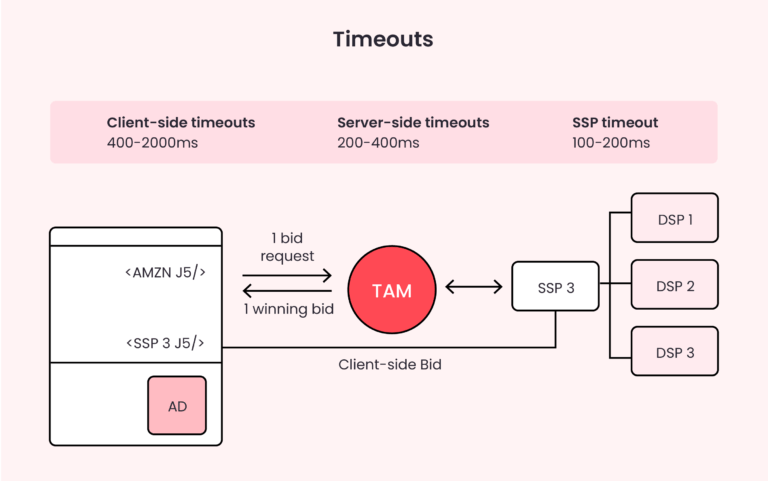
Publishers can integrate their ad servers (DFP) with Amazon and update the line items with new changes to start receiving bids.
Since Amazon is new to the game, it is recommended to use UAM/TAM with Open Bidding and Prebid to see better results.
Ready to Try Header Bidding? Here are 5 Steps to Prepare
We recommend these 5 steps to prepare for header bidding for publishers new to this tech:
Step 1: Ask whether header bidding is right for you
If you are new to header bidding, there is a high chance that you have used AdSense previously to monetize your traffic. With AdSense, most technical operations are managed by Google. However, header bidding completely relies on your technical expertise.
You can educate yourself about the header bidding, learn basic JavaScript. Alternatively, invest in building an ad ops team to handle these tasks for you. If none of these work, you can always choose outsourced ad ops to manage header bidding for you.
Step 2: Learn and read about header bidding
Even if you are taking the help of your ad tech team, investing time in learning about the tech pays well. For starters, it helps you build partnerships with HB demand partners.
Familiarize yourself with how header bidding works, what it can and cannot do for you, and improve from there onwards.
Learning about different types of header bidding, the biggest players in the market, and the adoption rate should help you make more educated decisions for your business.
Step 3: Be ready for challenges
Header bidding is fruitful, however, there are ongoing challenges with the tech as well. First, you will be adding extra pieces of code which can increase latency.
You will have to figure out reporting on your own. Unlike Google, here you have to work with your data engineers to create a reporting API and integrate it into Excel or similar services to see the growth (or decline).
If your current team is unable to handle this, you can take the help of managed header bidding solutions.
Step 4: Choose demand partner carefully
Demand partners (or yield partners) would connect you to the advertisers. You need to choose these partners carefully. Some examples of demand partners are Appnexus, Criteo, and Index Exchange.
These partners have standard checks and minimum requirements to allow publishers into their circle. You can reach out to them for partnership, however, if you are unable to manage them on your own, getting help from header bidding solution providers (like AdPushup) can help.
Step 5: Test, test, test and test some more
Header bidding makes sure publishers are handsomely rewarded for their inventory, but not without putting testing in action. A/B testing with bidders helps to increase the overall revenue and enables publishers to understand what works best for their inventory.
You should be focusing on scanning for errors, adding/removing demand partners to various line items, and boosting your overall revenue.
How to Set up Header Bidding?
To implement header bidding, publishers have to place a JavaScript code to their website’s <head> section. This code is used to trigger the auction when an impression appears.
If the publisher is capable of integrating the website with a header bidding wrapper, then Prebid.js is the most suitable option. However, if a publisher lacks the technical expertise to do so, then you may want to opt for a managed service provided by a third-party ad tech vendor.
Once the wrapper is added to the website, publishers can get in touch with demand partners to get access to their respective adapters. The adapters enable publishers to connect with the demand partner’s marketplace and find buyers for their ad inventory.
The setup can be divided into three easy steps:
Find the right demand partner: Great demand means great revenue. If you have good contacts with ad exchanges and SSPs, then adding a demand partner won’t be a problem for you. Don’t just go for the popular partners, examine and compare their services, and choose the ones that suit your audience profile basis the niche you operate in.
Install a header bidding wrapper: Next, you need to place a header bidding wrapper on the website. This works like a container, where you will be placing codes from all your demand partners and setting auction settings and rules. After this, every time an impression is available, your demand partners will receive requests to place bids.
Set timeouts and floor price: Adding too many demand partners without configuring the campaign can result in slow page loading. Hence, publishers must set up session timeouts, i.e., time limits for auction termination. Similarly, publishers need to set floor prices for different ad units and add any other limitations, as required.
Once done with steps, you still need to monitor and optimize the setup on an ongoing basis to make sure that you’re maximizing impression-level revenue without causing usability problems.
Header Bidding Extensions
Here are some header bidding extensions that you can install to snoop on your competitors to see what demand relationships do they have:
Headerbid Expert: A Chrome extension powered by Prebid, this tells the number of demand partners bidding on a certain webpage. Further, it tells the time taken by each partner to place their bids. Basis of the quick analysis provided by the extension, publishers get to know whether their timeout period is considerate or they are underselling their inventories and methods to fix these issues.
BidFilter: This extension shows detailed results like the names of the demand partners added in the wrapper along with the bids received on individual ad sizes. The tabs on extension show a list of all bids, winning bids, and empty bids (partners who didn’t bid intentionally or due to timeout).
In Closing
For publishers, header bidding is a quantum leap from Google’s monopoly and inefficiencies from other programmatic auctions. It opened up a more controlled platform with required transparency for both sides for ad tech.
Though it still has a few challenges to overcome, the increasing adoption rate is a sign that we, as an industry, will continue to use it. The early signs such as the introduction of server-side auction and availability of HB for video and AMP inventory is a sign that the tech is very flexible.
If you have any questions or concerns related to this, feel free to contact us.
Header Bidding and AdPushup
Level up your ad experience and maximize your earnings with our smart+ Managed Header Bidding solution.
We help our publishers with more than just header bidding. Our header bidding solution comes with an array of features to help increase the yield. We have built multiple ad optimization features using machine learning for our header bidding engine. On top of that, we have seasoned ad ops experts, providing managed services that come with 24/7 support.
To know more about our Smart+ Header bidding solution, click here.
Video header bidding works exactly like display header bidding using wrappers and adapters. To implement video header bidding, publishers should have demand partners with video inventory buyers. Based on the types of buyers you have, find VAST/VPAID ad server and/or update ad units with outstream video ads.
DFP (or Google Ad Manager) is an ad server that offers Open Bidding (Google’s S2S header bidding). Other than that, publishers can also use DFP to show performance (generate reports) of your other header bidding setup. This can be done by updating the line items with your demand (yield) partners.
Yes, WordPress publishers can also implement header bidding. All they need to do is add the heading bidding code or header bidding script in the head section of their website and that's it.
